3D Printing
Each library has a single MakerBot Sketch 3D printer for public use, so people can interact with this surprisingly accessible and useful technology.
If you are just looking for the Cura Slicer and don't need any further guidance, here it is: https://ultimaker.com/software/ultimaker-cura/#downloads
Otherwise, read on for a full walkthrough of the 3D printer service!
On this page:
This is a list of the headings on this page, feel free to use this to navigate to the specific subjects if you are using this as a guide:
- How the service works
- Overview of the printers
- Cost
- Procuring a digital 3D model
- Downloading the Ultimaker Cura slicer software
- Preparing your file for printing
The latter half of this page is a basic guide to 3D printing.
If you would like to join one of our in-person Printing 101 sessions click here.
How the service works
We have these printers so that people can learn the basics of 3D printing. We will only accept prepared, sliced 3D files to print.
Please be aware that 3D prints take a while to complete and that our MakerBot Sketch printers are not the fastest, so expect your print time to be measured in hours, not seconds!
We require the print cost to be paid before we can start the print job (see cost below for more information on the print cost). Once complete, you will have 10 days to come and collect your print.
Please note, we will not print anything deemed offensive or explicit, no weapons, gang patches, etc.
In the event of a print failure, we will reattempt the print once (prints can sometimes fail). In the event of another failure, we will contact you to inform you of the failures. If the problem is not due to a fault with the printer itself (i.e.: we suspect a problem with your file), then we will cease attempting the print.
We will not be issuing refunds in these instances.
For this reason, if you have not used a 3D printer before, we recommend printing something small like a keyring to minimise the cost (around 5 dollars).
If the queue for the printer is getting long, we will limit the maximum print duration and/or number of prints someone can have in the queue.
Overview of the printers
The MakerBot Sketch is an FDM printer, which means it functions like a hot-glue gun, but is fed plastic filament. The filament is heated until molten and piped like icing, which is rapidly cooled and solidified. The printer nozzle then moves up 1/5th of a millimetre (0.2 mm) to the next layer, and starts again.
The maximum size of a print on a MakerBot Sketch is 15cm x 15cm x 15cm - but we could recommend keeping well within this size for the best odds of success!
We currently use PLA, a plant-based plastic that is popular due to its low cost and ease to print. At this point in time, we are not permitting people to bring in their own filaments.
Cost
In addition to a flat $1.50 fee to use the machine, there is a cost of $0.20 per-gram of PLA filament for your print.
We may also have more exotic materials on hand that can cost up to $0.40 per-gram. At this time we will not be permitting people to bring in their own filament, but we will try to keep a few colour options available at any given time.
Example cost of print:
You bring in a prepared print file. The print itself weighs 75 grams.
75 × 0.2 = $15
[weight in grams × 20 cents]
Plus $1.50 print fee = $16.50 total cost.
Please note that the cost must be paid before we can start a print.
Procuring a digital 3D model
Before you can prepare your 3D print, you need to choose what it is you want to print!
There are two ways to go about this:
- You could create your own file from scratch using 3D modelling software or Computer Aided Design (CAD) software
- You can use an online repository to find a 3D model
Creating your own file from scratch is a skill in of itself and is far beyond the scope of this guide. However, if you already dabble in such things, feel free to export a .obj or .stl of your work and proceed to the next step.
For most folks, your first print will be of a file you find online from a repository.
File repositories are kind of like YouTube, but instead of videos, people upload 3D models for public use.
We recommend either Thingiverse or Printables as good starting repositories to browse.
- Thingiverse - all of the downloads are free and the website has been around for a long time, so there are plenty of models to choose from! It does have more adverts though.
- Printables - most of the files are free. As the website is supported by one of the larger printer companies, it has a cleaner relatively ad-free experience. They also sponsor regular design contests, so you can come across some brilliant design options if a relevant contest has taken place in the past.
If you are doing this with a young one, be aware that anything could be uploaded to these sites, by anyone.
This is a good thing to do together as a supervised activity; best not to let them peruse these sites unsupervised in case they come across something explicit.
On either website, we can use the searchbar to find some 3D models to download.
If this is your first time using a 3D printer, keep it small and simple!
Keychains, small and simple figurines, a chess piece - these are all great examples of a first print.
Downloading a file and checking details
Once you have found the file you want and are on its page, scroll down past the images and you will see some details about the print.
Creators often stipulate some settings for printing the model, the two that you want to keep an eye out for are rafts and supports, as those are super important to your print succeeding!
Also, if you are planning on selling the print or iterating upon it, check the licence that the creator has used.
Files that we download are most commonly .stl files, though .obj is also an accepted file type.
Downloading the Ultimaker Cura Slicer software
Now that you have your 3D model, you need to prepare it for printing. This is called slicing, for reasons that will become clear shortly...
The slicer - Ultimaker Cura
Downloading and installing the slicer
The software used to prepare your print is called a slicer. There are many options out there, but for our MakerBot printers you need to use the Ultimaker Cura slicer, which can be found here: https://ultimaker.com/software/ultimaker-cura/#downloads
You will need to select the installer for your operating system and download the software. Once downloaded, run the install file and Ultimaker Cura will spend a few minutes getting set up on your computer.
First time setup
Once Ultimaker Cura is up and running you will be presented with this popup welcome box. All our first-time setup will be done in this window, click Get Started to continue.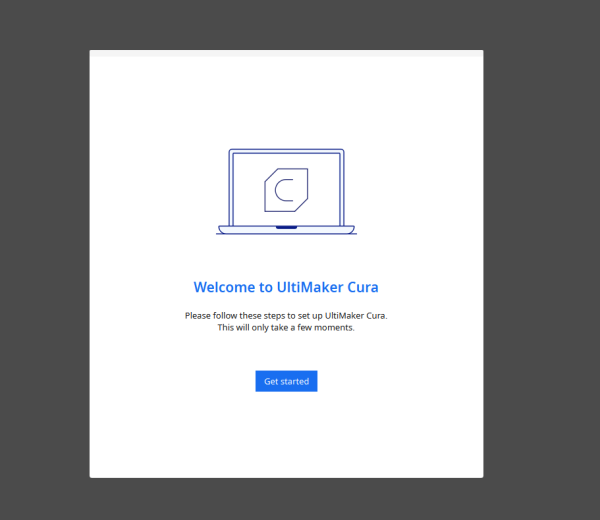
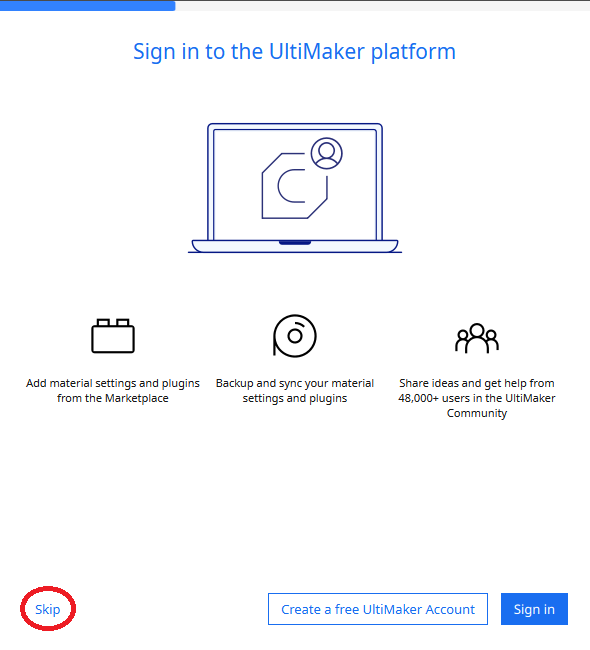
Continue until you are invited to make an ultimaker account. On the bottom left of the window there is an option to skip, click on this.
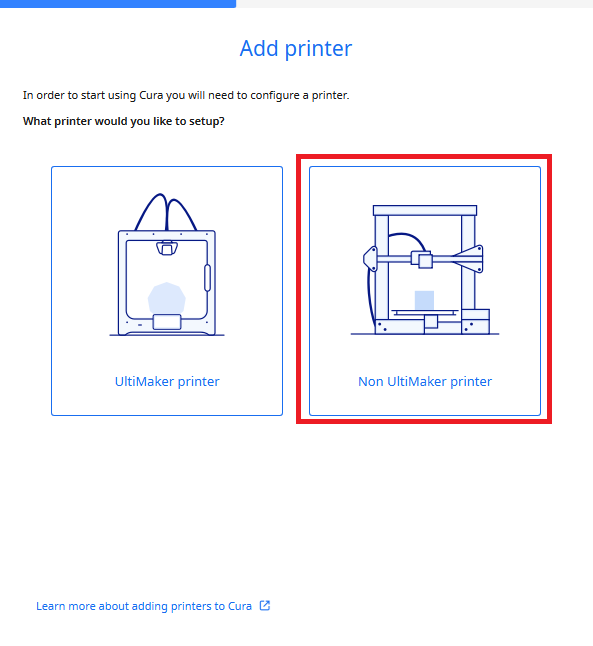
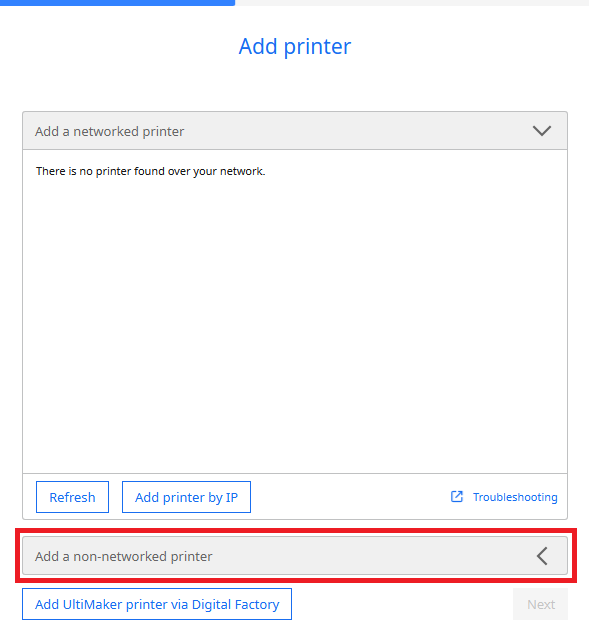
You will be asked to add a printer. Select the "non-ultimaker printer" option as pictured below.
You will then be shown the following screen. Click on "Add a non-networked printer" which will open up a dropdown list of printers.
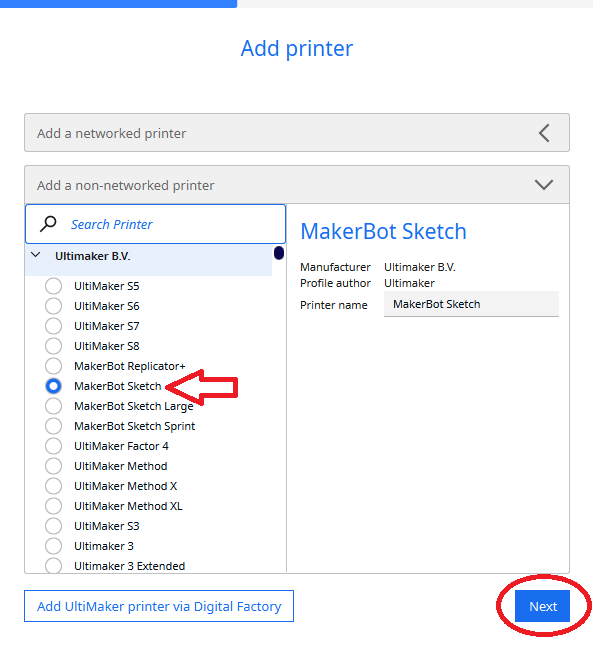
We here at the libraries are using Makerbot Sketch printers. Select Makerbot Sketch from the list of options, then press next.
Once that is complete, Ultimaker will show you some new features (feel free to skip these) and your setup will be complete! Welcome to the slicer software, which is now set up to prepare files for our printers.
And don't worry, this only needed to be done on your first time running the software; Cura will remember all your settings on future uses.
Preparing your file for 3D printing
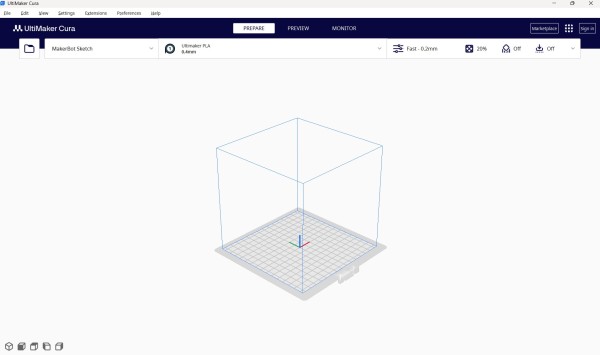
Now that setup is complete, we can see that the slicer is ready for us to use. You can see that the MakerBot Sketch is selected and Ultimaker PLA is the material in use - this is ideal!
First we will import our .stl file (or files), then we will go over the tools available in this software. Files can be imported one of three ways:
- Drag files from your file browser into the slicer
- Use File > Open file on the top toolbar
- Clicking on the folder icon at the top left
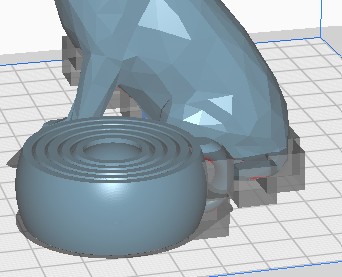
Here, I have imported two objects (partially to demonstrate that you can), a stylised dog figurine I found on Printables and this cool gyroscopic keychain from Thingiverse.
Once you have imported your object or objects, you will see that the platform is now showing the object!
Now that your model is in the slicer, lets go over the layout of the user interface.
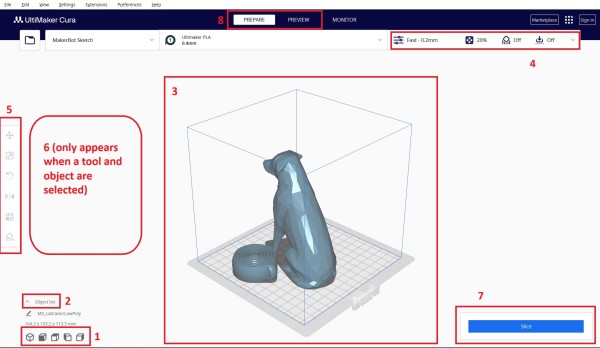
- This widget can help you reset the camera if you ever get lost in the 3D environment. If you ever get lost in space, click the leftmost cube icon to return to the original view.
- The object list is a good way to select individual objects, particularly if they are overlapping each other on...
- The virtual build plate, which represents the build plate on the printer itself, the floor upon which your printer will construct your object. You can see how large your object is in relation to it, is and where on the plate it rests.
The cube outline represents the maximum build volume - the printer can only print inside this cube. - Print settings - the primary settings to configure here are to enable supports if the print needs them, you can also enable the raft (less commonly needed) under "Adhesion". More on these settings on the next step!
- Your tools, for now the primary tools to use are Move, Scale and Rotate. The Support Blocker tool is also here. Play around with these tools and experiment until you get the desired result!
- The information panel shows relevant information about your selected object, based on the current tool you are using. For example, select your object and the Scale tool, and you will see the dimensions of your print in millimetres.
- The Slice button! When you click this button the software will begin to process your file. Information on what it is doing (and the answer to the burning question - why is it called slicing? - can be found below under "the sliced file" heading.
- The Prepare and Preview buttons (we don't use monitor as you won't connect to our printer). Prepare mode is where we arrange our objects and use the tools and tweak settings to achieve the desired print result.
Preview will let us look at our sliced file before we export/save it, to make sure we are happy with the supports, how much material it will use, etcetera.
Tips and settings
- You can right click to see a range of handy extra tools and options. Arrange all models is a super handy one if you are printing multiple objects in one go!
- In the settings menu you can play around with your infill percentage to reduce weight (cost) or increase strength. 15-20% is pretty standard and will deliver solid parts, returns for strength diminish after 30-40%. Don't go above 50% without really good reason, there really isn't a point beyond adding weight.
- Infill patterns can change the strength too - zigzag, gyroid and cubic are all great options. If you want to get your weight down (and the printed object is decorative i.e. not going to be under any load or stress) try lightning infill.
- If you are using supports, I strongly recommend using the tree supports, they are far easier to use. If you can get away with support placement "Touching buildplate" instead of everywhere, do so. Combine this with the support blocker tool and you can set yourself up for really clean results!
- If you insert a USB memory stick into your computer, the Cura software will detect this and offer to save it directly to your USB stick and offer to eject the drive safely once the file is saved.
- Control + Z to undo a step (or Edit > Undo on the top bar).
The sliced file and preview mode
After you click Slice, the slicer will process your print job and output a file that breaks the object down into simple and specific instructions for each motor within the printer, as well as the heat of the nozzle, step by step, layer by layer. It slices your file into horizontal layers (like a pancake stack) for the printer.
Hence the name slicer and sliced file!
After the slicer has finished processing your file, click the preview button at the top of the screen. In this preview, you can see how long the print will take and how much PLA it will use, measured in grams.
You are also presented with a slider on the right-hand side of the screen, which you can drag to look at each layer of the print.
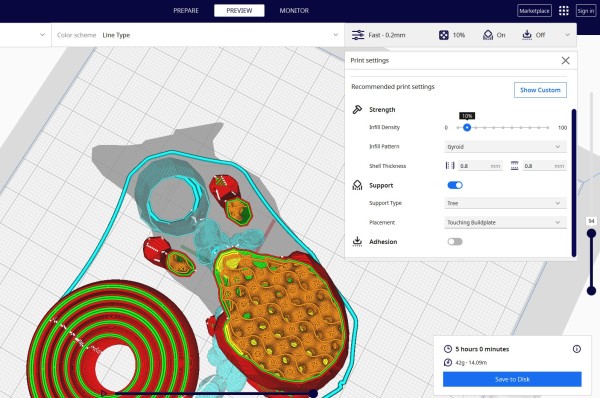
The printer builds a model layer by layer, starting at the bottom/base of the model, then goes up layer by layer, like building a brick wall. You might also notice that the inside of the file is a series of random lines - that is because prints are mostly hollow. There is a scaffold-like lattice of plastic within, designed to prop-up the outer wall of the print. This reduces print time, cost and warping as the plastic cools.
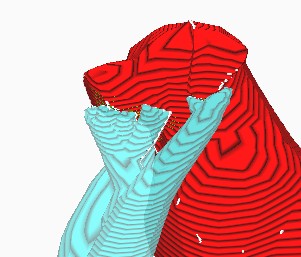
In the preview mode different parts of the print appear in different colours. The support material shows up as this light blue colour, outer walls in red, infill in orange, etc. All of this will be the same colour (say, purple) when you print the actual object; the different colours are just to help us figure out what is going on.
Looking at the above image, this print is 42 grams. I think I will use support blockers to prevent support on the stomach of the dog; I think it might be excessive and supports do leave some scarring on the object. I also check that there are no supports inside the keychain - that would turn it from a gyroscope into a brick!
I click on Prepare at the top to return to prepare mode. Then I use the support blocker tool on the left-hand side of the screen to place these blocking cubes on the dog's stomach and around the hind legs. I also add some blockers to the keychain as I don't think I need the loop supported.
I slice again and check out the results in the preview tab. I actually missed a spot so I go and add another blocker. This is the result (same layer as the preview from a couple images ago):
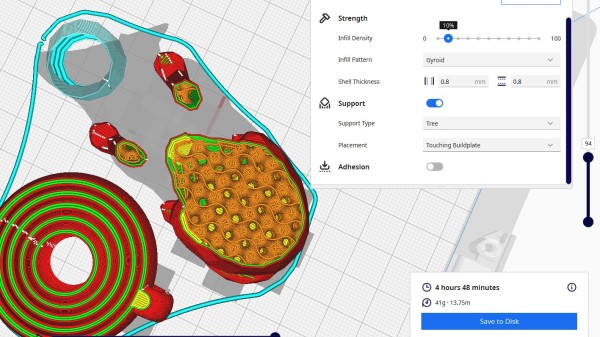
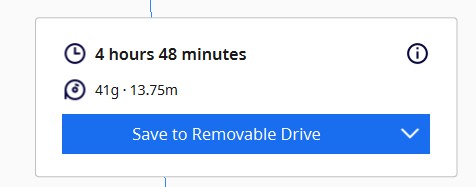
We have managed to save a gram and 12 min of print time, but more importantly we have removed potentially superfluous supports which we would have had to remove by hand afterwards! Note that the dog's ears and jaw are still supported as they overhang and will likely need the assistance.
I am happy with the result, so I will insert my USB sick and the "Save to Disk" option will update to a "Save to removable drive" button. Click that and wait for it to process.
Once complete, a button will also appear offering to eject the drive for you.
Bring this file into the library on your USB stick and a librarian will give you a form with some details to fill out (file name, what colour you want, etc) and once you have paid for your print (this print would cost $9.70, see cost) we will get it in the queue!